TRHD - The Hat Makes The Outfit

Saturday, August 31, 2019
Hello everyone!

I am up on The Rabbit Hole Designs blog today ... head over and give them some love!


I am sharing a card  I made using one of The Rabbit Hole Designs stamp sets. 

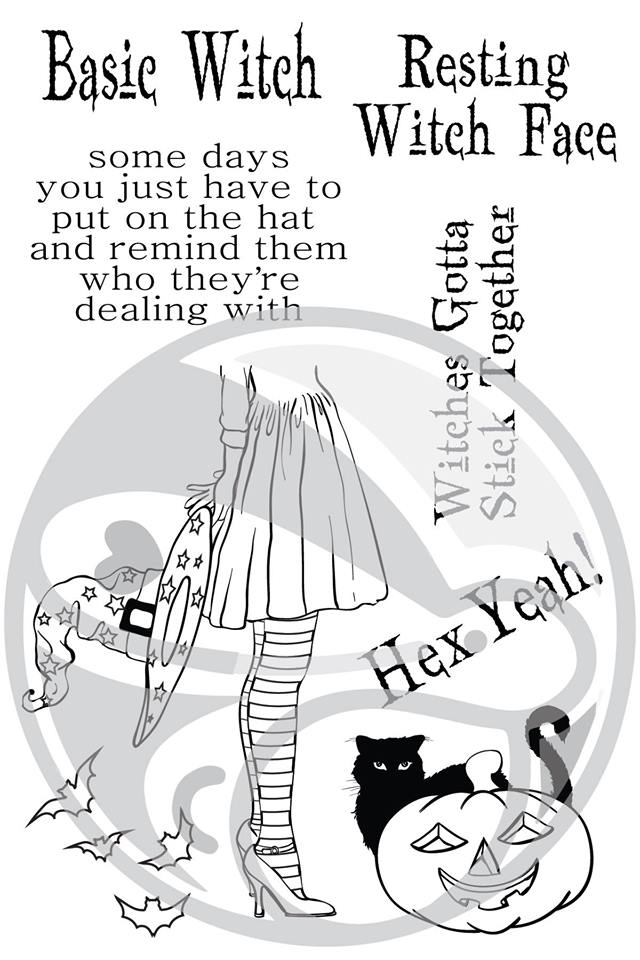
For today's card I used the Hex Yeah & Boo to You stamp sets.


How to create this card:


  • Black A2 card base
  • Added purple layer 
  • Added my white layer with the sentiment from Hex Yeah
  • Stamped the Hat from Boo To You set.
  • Copic colored the image
  • Fussy cut the hat out because I didn't want to use the cat in the image
  • Raised the hat up with foam tape for dimension
  • Added orange Nuvo Drops randomly
Here is one more picture of the full card ...


TRHD Products used:

For more inspiration, updates, and news make sure to check out these places

The Rabbit Hole Designs YouTube


I have had so much fun playing with the Hex Yeah and Boo To You stamp sets.

Thank you so much for stopping by and spending some time with me.

Until next time ... Hugs & inky fingers!   -Nic-

0

TRHD - Gourd-Geous!

Wednesday, August 28, 2019

Are you ready for day 3 of  The Rabbit Hole Designs September release?
I know I am!! This month is a great one!

They have new stamp sets over
these last 3 days.

Today's stamp set is called Gourd-geous
I do have 2 cards to share with you today using the Gourd-geous stamp set.

Here is a look at the images in the set:

For my first card I had this vision of a one layer card, and let me tell you it turned out better than I envisioned!  Don't you love when this happens?? Anyways ... I started with a standard white A2 card.  I stamped my pumpkin with the scarecrow hat in the bottom right of my card with brown Amalgam ink.  I Copic colored him.  I stamped Hey Gourd-geous! in the same brown Amalgam ink.  I finished it off with crystal gems.  I absolutely LOVE how it turned out.


For my second card.  I had previously flocked some orange onto a black piece of cards stock a while ago, just waiting for the right card to scream out.  I found the right image  for that ... Hey Gourd-geous! I flocked the upper right corner of my black card front.  I white embossed the sentiment #underyourspell the bottom center of the card front.  I Copic colored my pumpkin, fussy cut her out, and popped her up with foam tape.  I added random Nuvo drops in the colors of my image to finish off the card.  The flock definitely makes the card. 


Here the two cards are together, what do you think?  Which is your favorite?  I love them both for very different reasons.  This has definitely been one of my favorite releases.  Halloween is definitely my holiday to decorate for!


GIVEAWAY:
To celebrate day 3 inspiration The Rabbit Hole Designs is giving away the stamp sets Pumpkin Friends and Gourd-geous to one lucky winner. Winner will be chosen at random from the comments left on participating blogs, so make sure to visit each stop and leave a comment. Leave comments by 11:59 pm PST 08-29-2019 on all participating blogs.
Winner will be announced on The Rabbit Hole Designs blog 08-30-2019.

Hop along to the next person on the list ... which is Amanda S.!

Niccole <------- YOU ARE HERE

Every order place through Simon Says Stamp will receive a free gift with purchase. You can find TRHD product  ... HERE


Every order placed will be eligible for a 10% discount. Discount Code TRHD2019 this code will only be accepted until Friday 08-30-2019 at 12:01a.m. PST. EXCLUDES Dies and Crafters Essentials. Not applicable to previous orders. May be used more than once. Does not apply to shipping and tax.

Thank you for stopping by and make sure you come back tomorrow for day two of The Rabbit Hole Designs Inspiration Hop.

Until next time ... Hugs & inky fingers! -Nic-
19

Ai - Halloween Pumpkins

Hello Ai fans!!

I am stopping by today to share a Halloween card I made using the 5038 - Ghoul Friend set  and some Wink of Stella. I was a fun card to make that's for sure.
It is a pretty straight forward card layout this week.  I stamped my Happy Halloween bottom center. I layered my orange paper, and black paper. The white paper is on top of the black paper. I only use what I have to of my stripe paper so I cit 1/4" strips and added them to the top and bottom of my white paper stamped with my strand of pumpkin lanterns. I colored my pumpkins last with my Copic markers. 
As you can see above I used a super fine Sharpie marker to join the two stamps together.  I thought the loop in the string would add to the card, like a loop in the stand of pumpkin lanterns. I didn't let the imperfections of my marker skills bother me because when you look at the whole card the strand is not perfectly straight to begin with. 
I thought the cute pumpkins needed a little something so I finished them off with some Wink of Stella. Why ... because everything looks better with Wink of Stella in my opinion LOL.
Here is one more look at the card.  You will probably see more Halloween cards from me ... it is my favorite holiday after all. Pumpkin everything for this girl 😊  Thank you for spending a little time with me and please check back again real soon for more Ai inspiration.

Copics used:
YR02
YR04
YR07
YR09

Until next time ... Hugs & inky fingers!

1

TRHD - Boo To you!

Tuesday, August 27, 2019

Are you ready for day 2 of  The Rabbit Hole Designs September release?
I know I am!! This month is a great one!

They are releasing new stamp sets over
these 3 days.

Today's stamp set is called Boo To You
I do have 2 cards to share with you today using the Boo To You stamp set.

Here is a look at the images in the set:


For my first card I started with a standard gray A2 sized card base. I layered a white piece a 1/2" smaller to the base.  I stamped my cat with the witch hat image in the center along with a couple random spiders. I Copic colored my image. I drew a line to make my spiders drop down further.  I cut a scalloped frame from my stash.  I glued it to my card.  To finish it off I added some orange Nuvo Drops.


For my second card I used some Gina K Glitz Glitter Gel in black and stenciled the Diamond Flowers on the top half of my card.  I stamped the Happy Halloween sentiment ant attached it to an orange piece and added it to my card. For the bottom 1/4 I added the spider stamp repeatedly across the bottom.  I added an orange strip to seperate the two.  I love how simple this card is.


Here they are together.  Do you have a favorite?  I know what one is my ... the spider one for sure.  I mean I love them both but I really like how the black and orange one turned out.


GIVEAWAY:
To celebrate day 2 inspiration The Rabbit Hole Designs is giving away the stamp sets Pumpkin Hair Don't Care and Boo To You to one lucky winner. Winner will be chosen at random from the comments left on participating blogs, so make sure to visit each stop and leave a comment. Leave comments by 11:59 pm PST 08-29-2019 on all participating blogs.
Winner will be announced on The Rabbit Hole Designs blog 08-30-2019.

Hop along to the next person on the list ... which is Amanda S.!

Niccole <------- YOU ARE HERE

Every order place through Simon Says Stamp will receive a free gift with purchase. You can find TRHD product  ... HERE


Every order placed will be eligible for a 10% discount. Discount Code TRHD2019 this code will only be accepted until Friday 08-30-2019 at 12:01a.m. PST. EXCLUDES Dies and Crafters Essentials. Not applicable to previous orders. May be used more than once. Does not apply to shipping and tax.

Thank you for stopping by and make sure you come back tomorrow for day two of The Rabbit Hole Designs Inspiration Hop.

Until next time ... Hugs & inky fingers! -Nic-

14

TRHD - Hex Yeah!

Monday, August 26, 2019

Are you ready for The Rabbit Hole Designs September release?
I know I am!! This month is a great one!

They are releasing new stamp sets over
the next 3 days.

Today's stamp set is called Hex Yeah
I do have 2 cards to share with you today using the Hex Yeah stamp set.

Here is a look at the images in the set:


I had a lot of fun with this set. For my first card I randomly stamped the bat image to create my background. I colored two stamped cats and pumpkins using Copic markers.  I then fussy cut them out. I added my black piece of card stock and added the white piece a 1/2" narrower. I stamped Hex Yeah! in the middle.  I attached the two colored pumpkins and added Wink of Stella to the cats. I finished it off with orange Nuvo Drops.  I love how it turned out.


For my second card I started with a standard A2 white card base.  I die cut a gray frame slightly smaller than my card base.  I Copic colored and fussy cut my witches.  I attached them to the back of my frame.  I attached the frame to my card with foam tape.  I finished it off with a few crystal jewels. 


Here are both of the cards together.  I absolutely LOVE how they turned out.  Neither are what I envisioned for the cards but I love the finished product.  


GIVEAWAY:
To celebrate day 1 inspiration The Rabbit Hole Designs is giving away the stamp set Hex Yeah to one lucky winner. Winner will be chosen at random from the comments left on participating blogs, so make sure to visit each stop and leave a comment. Leave comments by 11:59 pm PST 08-29-2019 on all participating blogs. Winner will be announced on The Rabbit Hole Designs blog 08-30-2019.

Hop along to the next person on the list ... which is Amanda S.!

Niccole <------- YOU ARE HERE

Every order place through Simon Says Stamp will receive a free gift with purchase. You can find TRHD product  ... HERE


Every order placed will be eligible for a 10% discount. Discount Code TRHD2019 this code will only be accepted until Friday 08-30-2019 at 12:01a.m. PST. EXCLUDES Dies and Crafters Essentials. Not applicable to previous orders. May be used more than once. Does not apply to shipping and tax.

Thank you for stopping by and make sure you come back tomorrow for day two of The Rabbit Hole Designs Inspiration Hop.

Until next time ... Hugs & inky fingers! -Nic-
20

Ai - Gingham Challenge

Thursday, August 22, 2019
Hello Ai fans!!

I am back again to share another card showcasing the current challenge for Art impressions.  This one is the Gingham challenge. I using a new stamp set being released called Feast Mode.  It has a  bunch of adorable critter images and wonderful sentiments to go with it.


For this card I layered pattern paper which included the challenge ... Black and white gingham paper. I layered the red paper, followed by my gingham paper.  I trimmed down a couple strips of brown wood looking paper to add to the top and bottom of my gingham paper.


I colored my critter with my Copic markers.  Isn't it fun that there are so many fruits and veggies to color? I cut my glitter paper with one of the dies in the Banner Die Set.  I trimmed the same kraft paper to go behind my banner. I added my little critter to the bottom of the banner with foam tape. 


I stamped the sentiment Give Thanks on white card stock, trimmed it down and added it to my banner. I added the banner to my card.  I finished it off with crystal gems. 


I love how the pattern papers really make this card pop. Thank you so much for stopping by.  Please head on over to the Ai blog to participate in the gingham challenge.  you don't want the chance to win an awesome prize?

Copics used:
E18
R11, R22
R24, R27, R29
R35, R37
W00
W1, W3, W5
Y15, Y17
YG23, YG25, YG63, YG67
YR21, YR23, YR24, YR27


Until next time ... Hugs & inky fingers!


0

Ai - OUCH! Feel Better!

Wednesday, August 21, 2019
Hello Ai fans!!

I am up on the Art Impressions blog today sharing a card using the Doggy Kisses and Wine Divas stamp set. Head over to the blog and give them some love.


I did not intend to create a one layer card but sometimes the stamps decide for you what direction you are going with your card.  LOL Anyways ... I started by stamping my sentiments in the middle in black. I used the Ouch sentiment from Doggy Kisses stamp set and I used only part of the sentiment in Wine Divas for the feel better.  From there I randomly stamped the band-aid from the Doggy Kisses stamp set in rainbow colors.


I always find it hard to photograph Wink of Stella. Do you agree?  I added Wink of Stella to all the center of the band-aids for some texture to my one layer card.


I finished it off with Nuvo Drops in the same rainbow colors to give a lot more dimension to my one layer card.  I love how cheery this card ended up being.  A great pick me up card for someone hurt or injured.

Here is one more look at the complete card ...

Remember ... try and stretch you stamps out of the norm from what they were intended for, as there is no dog on this card as the stamp set would imply, just a general feel better card.

Like I said earlier sometime a one layer card is all you need to get your point across. Please stop back again soon and see what I have been up to.

Until next time ... Hugs & inky fingers!

0

TRHD - Miss Your Face!

Sunday, August 18, 2019
Hello everyone!


It's Niccole from Nic & Viv Designs back again to share another card I made using one of The Rabbit Hole Designs stamp sets. 

For today's card I used the Diamond Flower Stencil, The Sassy stamp set, and the Sassy Sentiment stamp set.  


How to create this card:


  • Cut an A2 size black card base
  • Stencil image with fuchsia ink on a white piece of paper
  • Die cut large circle from stenciled image (circle die from my stash)
  • Die cut small white circle (circle die from my stash)
  • Die cut cloud image out of white paper (cloud die from my stash)
  • Glue circles to black base
  • Stamp sentiment from Sassy Sentiments to the front of cloud
  • Add cloud to card with foam tape
  • Copic color Unicorn and fussy cut
  • Add Liquid Pixie Dust to Unicorn
  • Add Unicorn to white circle with foam tape
  • Add crystal gems to card
Here is one more picture of the full card ...


TRHD Products used:

Diamond Flower Stencil

For more inspiration, updates, and news make sure to check out these places

The Rabbit Hole Designs YouTube


I have had so much fun playing with the 

Thank you so much for stopping by and spending some time with me.

Until next time ... Hugs & inky fingers!   -Nic-

0

I Ink you're Great!

Friday, August 9, 2019

Hello everyone!!! 


It's Niccoleback again to share another card I made using one of The Rabbit Hole Designs stamp sets. I am up over on their blog today.  Head over and give them some love.


For today's card I used the newly release stamp set called Inky.


How to create this card:
  • A2 sized card base in black
  • Stamped my ink splatter in rainbow order on the bottom first
  • Flipped the card base and stamped again to match the opposite side
  • Trimmed my stamped images down 1/4" all around 
  • Trimmed extra off the sides to make the black show more on the sides
  • Glue white stamped image and white strips down
  • Stamped sentiment and framed it with black
  • Add sentiment to card with foam tape 
  • Add jewels in a random pattern
Here is one more of the full card ... 


TRHD Products Used:

Inky


For more inspiration, updates, and news make sure to check out these places

The Rabbit Hole Designs YouTube


I have had so much fun playing with the 


Thank you so much for stopping by and spending some time with me.


Until next time ... Hugs & inky fingers!   -Nic-


0

Search This Blog

Powered by Blogger.